October 9, 2012
| Revision History | |
|---|---|
| October 9, 2012 | |
|
Added correct instructions for adding JDK 7 to the project. Previous version described process for linking against deprecated Apple JDK6 JavaVM framework. Also removed incorrect note about changing the jni.h include in the JNI header. Also added note about JNF_COCOA_ENTER and JNF_COCOA_EXIT rethrowing Objective-C exceptions as Java exceptions. Also reworked the Objective-C implementation (3.1.10) so that the JNI environment is not accessed from a separate thread. Added more comments to the example. Thanks to Mike Swingler (@swingler) for these corrections. | |
Table of Contents
- 1. Synopsis
- 2. Source Code
- 3. What is JNI?
- 4. Wrapping the
NSSavePanel - 4.1. The Implementation
- 4.1.1. The Tools & Workflow
- 4.1.2. Developing the Java Stub in Netbeans
- 4.1.3. Generating the C-Header Files with javah
- 4.1.4. Creating an Xcode Project
- 4.1.5. Adding the JDK Headers to the Project
- 4.1.6. Adding The Header File to the Project
- 4.1.7. Create the Objective-C .m file
- 4.1.8. Writing a Simple Test Loader
- 4.1.9. The JavaNativeFoundation Framework
- 4.1.10. Implementing the Objective-C Function
- 4.1.11. Testing It Out
- 4.2. Deployment
- 5. Other Resources
This article describes how to build Java library that makes use of
some native functionality on Mac OS X. It gives a brief introduction to
JNI (the Java Native Interface), then provides some concrete examples of
an implementation of a native wrapper for the
NSSavePanel cocoa component.
You can download the source code for the project in this tutorial via Subversion at: http://weblite.ca/svn/tutorials/jni_osx/trunk.
JNI stands for "Java Native Interface". It provides a way for Java code call native code written in C, Objective-C, or C++. If you are targeting a particular platform for your Java applications, it is likely that you will need to delve into JNI to some extent in order to provide a fully native experience to the user. One current example on Mac OS X is the file dialog. Later in this article we'll show how to create a JNI wrapper around the native OS X file dialog to obtain some features that aren't currently available in Java's built-in file dialog widgets.
The concept of JNI is actually quite simple. You define a java
method as "native", but you don't define a body for this method. You
then define a function in a C library whose name matches (using some
name mangling conventions) the signature of the java method. At runtime
you include the C library in your Java application via the
System.loadLibrary() method, then, when you
call the native Java method, it will call the C function and return its
result.
Now, lets move onto a concrete example. We're going to create a JNI method to be able to display the native OS X save panel with some added features that aren't available in the built-in Java save dialogs. Specifically, we want to be able to require a specific file extension for the name of the file that the user is saving. If the user doesn't specify the extension, then it will automatically be added for the user
Java provides two built-in dialogs for users to select files for opening or saving:
java.awt.FileDialogjavax.swing.JFileChooser
The JFileChooser class is a light-weight,
pure Java dialog that can be extended or customized in any way the you see
fit. However, since it is light-weight, it behaves slightly differently
(and depending on the theme, drastically differently) than the native file
chooser. Another problem is that it is incompatible with the Mac sandbox
(in which all applications that are sold in the App store must
run).
The FileDialog class is an older,
heavy-weight class. It essentially wraps a native file browser dialog in a
Java class. This means that it will always act like a native file dialog
(because it is). Because it is older and heavy-weight, it is far less
flexible than JFileChooser. Very little about it
can be changed. However, on OS X, it is the recommended way to allow users
to select files because of it's native look and feel. If you want to be
able to distribute your application in the App store, it is really the
only option because it will work inside the sandbox.
Tip
When I say that the JFileChooser won't work
inside the Mac sandbox, that means that it will only allow the user to
select files inside the application's container. Usually a user will
expect to be able to open and save files in their
Documents folder or Desktop.
That isn't possible with JFileChooser because it
is not (and cannot be) tied into the OS X sandboxing permissions
system.
The problem with the FileDialog is that it
currently doesn't include a number of useful options to tweak the dialog.
For example, it doesn't provide a clean way to require a specific file
extension for files that are saved with it. Cocoa's native
NSSavePanel includes a wealth of options for
creating many types of file dialogs that just can't be simulated
(currently) with the FileDialog class.
In order to overcome these shortcomings, we're going to create a JNI
wrapper around the NSSavePanel so that we can use
it in our Java application. This implementation will not be very flexible
as we are designing it to produce a save panel with exactly the options we
require for our application.
Our JNI library will consist, minimally, of 3 source files:
NSSavePanel.java- The Java wrapper class that contains the native stub for displaying the save panel. (Fully qualified class name isca.weblite.jniexample.NSSavePanel).ca_weblite_jniexample_NSSavePanel.h- The C header file for the JNI library. This file name follows the JNI naming convention where the file name is the same as the Java class name, but with '.' replaced with '_'.ca_weblite_jniexample_NSSavePanel.m- The Objective-c implementation.
The output (i.e. after building) will consist of only 2 files:
jniexample.jar- Contains the Java .class files.libsavepanel.dylib- The OS X shared library containing all of the native code.
It is also possible to include the dylib inside the jar file, but we won't discuss that tweak here. At runtime, you just need to make sure that the dylib file is located in one of the directories listed in the java.library.path System property.
For this example, we will use Netbeans to develop the Java
library. We will then use the javah command-line
tool (or ANT task) to generate the C header file for our library. Then
we will create a new Xcode project to develop the Objective-C
portions, and add the header file that was generated by
javah to the project.
For the Java stub, we don't require any special type of netbeans project. You can add native methods to any class in any Java project. They will compile fine even if the native methods haven't been implemented yet. The linking doesn't happen until runtime. The file structure for this example is as follows:
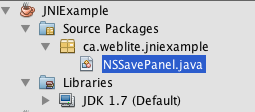
The contents of the NSSavePanel class is
as follows:
package ca.weblite.jniexample;

/**
 * A wrapper class for the Native save panel in OS X
 * @author shannah
 */
public class NSSavePanel {

    public static boolean loaded = false;
    static {
        try {
            System.loadLibrary("savepanel");
            loaded = true;
        } catch (UnsatisfiedLinkError err){
            throw new RuntimeException(err);
        }
    }

    public native String saveDialog(String title, String extension);

}
Let's look at this example piece by piece, starting with the last part: the native method definition:
public native String saveDialog(String title, String extension);
This is the stub for the native method that will be defined in our C-library. This looks the same as a normal Java method signature except for two things:
The native identifier. This tells Java to look in the loaded C-libraries at runtime for the method definition.
There is no method body. In this sense the definition looks very similar to an abstract method definition, and, in effect it is. An abstract method signals that it will be implemented by a subclass, so no body is necessary. A native method signals that it will be implemented by a native C library, and thus doesn't require a body.
Now, let's look at the first part of this class definition:
public static boolean loaded = false;
static {
    try {
        System.loadLibrary("savepanel");
        loaded = true;
    } catch (UnsatisfiedLinkError err){
        throw new RuntimeException(err);
    }
}
This is the code that actually loads the native library that we are going to create. We place this in a static block so that it runs before any code in the class does, and thus should have happened by the time any call is made to the saveDialog method. You actually have quite a bit of flexibility in how and when you load your library. In some cases you may have one large library that contains all of your native method definitions. Then you would probably load this from a central location, then Java would look there for your native method definitions. All that matters is that some library containing your method definition has been loaded a some point at runtime.
The key ingredient here is the
System.loadLibrary() call. It will look in
all of the library path locations (specified in the
java.library.path System.property) to find a
library named libsavepanel.dylib. It it finds it
and it is able to load it successfully then execution proceeds
smoothly. If, for some reason, it fails to find or load the library,
it will throw an UnsatisfiedLinkError, which
you can catch and handle however you like. In this case we are
wrapping it and just throwing a
RuntimeException. In practice you should
probably handle this with a bit more grace and fall back to some
default behavior.
Tip
On Mac OS X, all dynamic libraries must begin with "lib", so
even though the loadLibrary() method says
to load the library named "savepanel", it will actually be looking
for a library file named "libsavepanel.dylib".
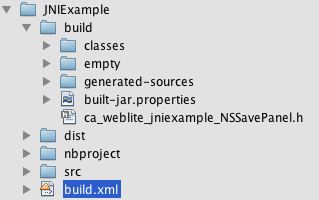
After you have created the java stub, we can generate the C-header files using the javah tool. In this example we're actually going to use the javah ant task. That way the header will automatically be generated every time we compile the project in Netbeans.
Modify the build.xml file of your Netbeans
project by adding the following before the closing
</project> tag:
<target name="-post-compile">
        <javah
            destdir="./build"
            force="yes"
            class="ca.weblite.jniexample.NSSavePanel"
            classpath="./build/classes"
        />
</target>
This basically says that we're going to generate a header file
to be saved inside the ./build directory for the
Java class
"ca.weblite.jni.example.NSSavePanel". Now,
after compiling our project we should see the file
ca_weblite_jniexample_NSSavePanel.h as shown in
the Netbeans file explorer below:
The contents of the
ca_weblite_jniexample_NSSavePanel.h file are as
follows:
/* DO NOT EDIT THIS FILE - it is machine generated */
#include <jni.h>
/* Header for class ca_weblite_jniexample_NSSavePanel */

#ifndef _Included_ca_weblite_jniexample_NSSavePanel
#define _Included_ca_weblite_jniexample_NSSavePanel
#ifdef __cplusplus
extern "C" {
#endif
/*
 * Class:     ca_weblite_jniexample_NSSavePanel
 * Method:    saveDialog
 * Signature: (Ljava/lang/String;Ljava/lang/String;)Ljava/lang/String;
 */
JNIEXPORT jstring JNICALL Java_ca_weblite_jniexample_NSSavePanel_saveDialog
  (JNIEnv *, jobject, jstring, jstring);

#ifdef __cplusplus
}
#endif
#endif
A Description of the Code. There really isn't a lot going on here. The key line to focus on here is the method signature:
JNIEXPORT jstring JNICALL Java_ca_weblite_jniexample_NSSavePanel_saveDialog
  (JNIEnv *, jobject, jstring, jstring);
Some key points to observe:
The method returns the type jstring. This is a JNI data type that is defined in
jni.hto act as pointer to ajava.lang.Stringclass. This return type is used because the JavasaveDialog()method that we defined, returns a typeString, so the native method must return a corresponding type.The name of the method has been named with the following naming convention:
The method name starts with
Java_After the
Java_prefix, the remainder of the method name matches exactly the fully qualified method name from Java, except that dots (".") have been replaced with underscores.
The first parameter is a
JNIEnvpointer that provides information about the JNI environment to the method. This is very useful for accessing the many utility functions that are available to help you navigate between Java and Objective-C types.The second parameter is of type
jobject, which is the JNI equivalent ofjava.lang.Object. If serves as a pointer to "this" (i.e. theNSSavePanelon which the method is running). This parameter would not be present if our method had been declaredstatic.Finally, the last two parameters of type jstring correspond with the two parameters that are passed to the Java method.
Finally, we can proceed to build our native library in Xcode. For this example, I'm using Xcode 4.4.
Step one is to open Xcode and start a new project.
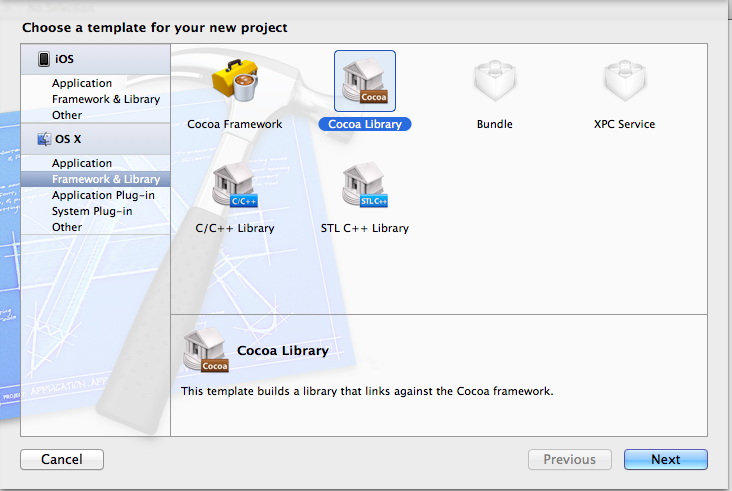
Select the "Cocoa Library" option as we wish to distribute our library as a dynamic library (.dylib).
Click Next
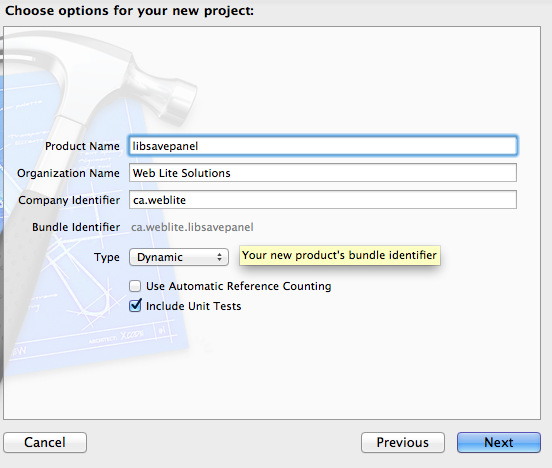
On this pane, we enter the product details. For convenience, I'm naming the product "libsavepanel", so that it will produce a library named "libsavepanel.dylib" when it is built automatically. You could, of course, just rename the library later or change a setting in Xcode if you want to name your product something else.
Important
You must uncheck the "Use Automatic Reference" counting
option. If you fail to do this, you will experience crashes when you
try to use JavaNativeFoundation functions like
JNF_COCOA_ENTER and
JNF_COCOA_EXIT.
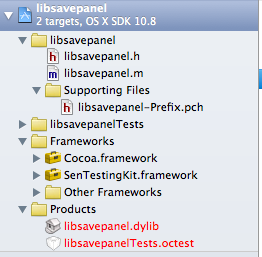
Click "Next" to select a location to save the project. Once you have selected a location, Xcode should open the empty project for you.
The project explorer on the left column of the Xcode UI will show the file structure of the project as follows:
Since our project will depend on some libraries in the Java
development kit (e.g. jni.h), we will need to add
the the headers in the JDK's include directory to our project's header
search path. As of OS X 10.7, all of your JDK libraries will be
located in the /Library/Java/JavaVirtualMachines
directory. You can either add the full path to JDK's
include directory, or you can copy the
include directory into your project folder, and
then add that copy to your header search path. For this example, we'll
copy it into our project directory so that the project is more
portable (i.e. we won't have to depend on the installation location of
the JDK in order to build our library.
We'll do this in a few steps:
Create a folder inside the project's directory called
jdk.Copy the central JDK's include directory into the
jdkdirectory we just created.$ cp -r /Library/Java/JavaVirtualMachines/jdk1.7.0.jdk/Contents/Home/include \ /path/to/libsavepanel/jdk/include
Add both the
jdk/includeandjdk/include/darwindirectories to the project's build target'sheaders search path. This can be accomplished inside Xcode by clicking on thelibsavepaneloption (the top option) in the project explorer (i.e. the left column of Xcode), then clicking thelibsavepaneltarget under theTARGETSsection of the next column (left column of the main panel).Finally, in the
Build settingspanel (the main section with all of the target properties), find the "Header Search Paths" option.Double click the empty space to the right of this option to edit the search paths. Then add the following two search paths, each on their own line:
$(SRCROOT)/jdk/include$(SRCROOT)/jdk/include/darwin
Note
If you type in these search paths wrong, you'll likely see errors when you try to build your project indicating that jni.h could not be found. If you get such errors, take a good look at these search paths to ensure that the are pointing to the correct location, and that you have correctly copied the JDK headers into the correct location.
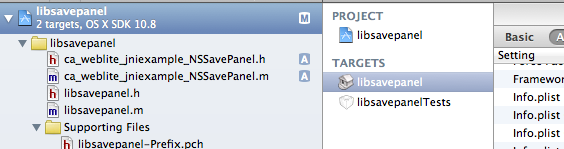

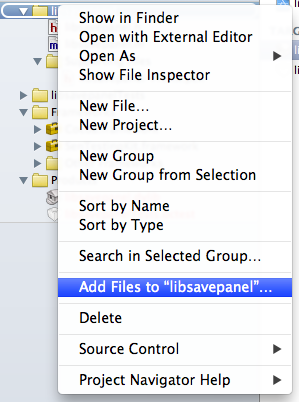
Now that our project is created, we proceed by adding the header
file that we generated for our JNI library. Right-click (or
control-click) on the libsavepanel folder in the project explorer of
the Xcode project to reveal the context menu. Then select the option
"Add Files to libsavepanel..."
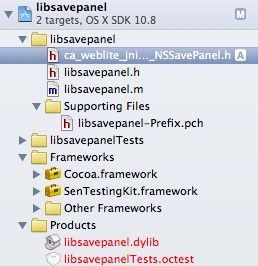
Then select the
ca_weblite_jniexample_NSSavePanel.h file that was
created. Once the file has been added, it should appear in the project
explorer as shown below:
The implementation of our native method will go inside a .m file that we need to create. We're do that by selecting "File" > "New" > "File" from the top menu bar. And then selecting "Objective-C Class" for the file type:
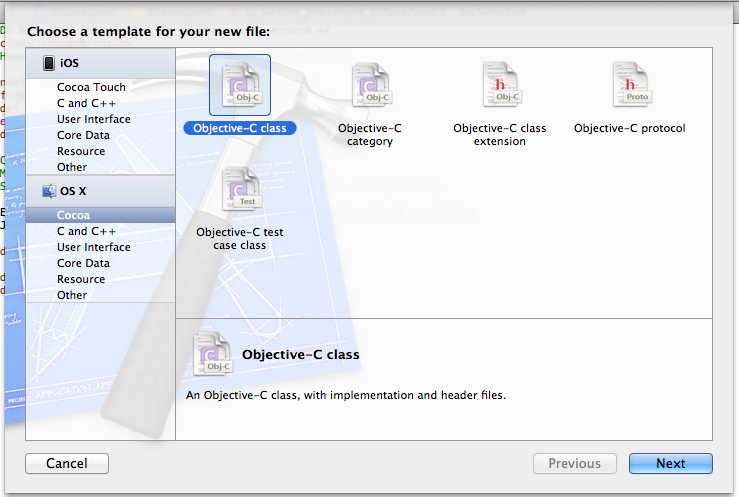
When it prompts you for the class name enter the exact name of
your header file (minus the .h). E.g. in this case our class name will
be "ca_weblite_jniexample_NSSavePanel".
Note
We don't actually need to create an objective C class. We just needed to create a file that would be compiled using Objective-C. When the file is generated, we'll delete its contents and start fresh anyways. Ultimately we just want an implementation file to accompany the .h file.
Now that we have our objective-c implementation file, let's delete the contents and create an empty function to correspond with the definition in our header file:
#include "ca_weblite_jniexample_NSSavePanel.h"

JNIEXPORT jstring JNICALL Java_ca_weblite_jniexample_NSSavePanel_saveDialog
(JNIEnv * env, jobject jthis, jstring title, jstring extension){

    return NULL;
}
Essentially I created this method definition by copying the signature from the header file, then adding parameter names to the parameter types.
At this point, we have enough to at least test and make sure
that our library can be loaded and used properly. Begin by building
the Xcode project ("Project" > "Build"). Then right click on the
libsavepanel.dylib item in the "Products" folder
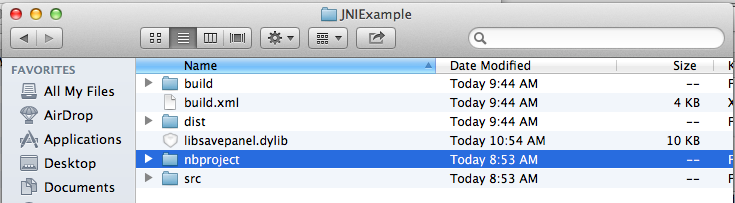
of the Xcode project explorer, and select "Show in Finder".
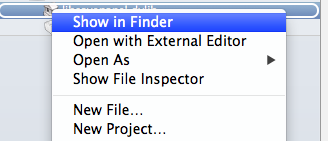
This will allow us to copy the dylib file into our Java project
directory. After copying the libsavepanel.dylib
file into our JNIExample project directory (the Netbeans project), our
project directory will look like:
At this point we have a bare-bones JNI module where the native
method only returns NULL. This is a good time to
test our module out and make sure that it, at least, is loaded
properly by our Java application. Let's add a
main() method to our
NSSavePanel class so that we can test out our
module.
public static void main(String[] args){
    new JFrame(); // Necessary to start the windowing system
    NSSavePanel panel = new NSSavePanel();
    String result = panel.saveDialog("Select a file", "pdf");
    System.out.println("The result was "+result);
}
Now, if you run this file from Netbeans, you should see the following output:
run:
The result was null
BUILD SUCCESSFUL (total time: 0 seconds)
So you can see that our native method returned null, just as expected.
Tip
If you don't receive this output, but instead receive an
UnsatisfiedLinkError, or if your application
just crashes, then you may want to doublecheck that your
libsavepanel.dylib is named correctly and
located in the top level of your project's folder (or in some
directory included in your library path).
Now that we know that our library is loading properly, it is all down hill from here. We just need to implement the native method in Objective-C. Before we move into the code, there is one more thing that we need to do with our Xcode project: Add the JavaNativeFoundation framework.
Tip
The Java Native Framework is a collection of C functions and
macros that provide easier interoperability between the Java world
and the Cocoa world. It includes functions for converting between
NSStrings and Java strings. The two most
frequently used macros are JNF_COCOA_ENTER(env)
and JNF_COCOA_EXIT(env) which are meant
to be called respectively at the beginning and end of each function.
These will set up and take down Autorelease pools, as well as help
clean up memory in case an exception is thrown in the body of the
method. In addition, these will catch Objective-C exceptions and
rethrow them as Java exceptions. If you don't use these, your
function will probably still work, but you run a greater risk of
introducing subtle bugs and memory leaks.
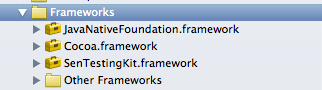
You can add the JavaNativeFramework by
right-clicking (or control-clicking) on the
Frameworks folder in your Xcode project explorer,
and selecting "Add files to libsavepanel...". Then, in the file
dialog, browse to the
JavaNativeFoundation.framework file located as
/System/Library/Frameworks/JavaVM.framework/Frameworks
Important
The JavaNativeFoundation framework is a
sub-framework of the JavaVM framework. Do not add
the JavaVM framework to your project if you are
using JDK 7 or higher. Only add the
JavaNativeFoundation.framework.
After adding the JavaNativeFoundation
framework to your project, the "Frameworks"
folder will look like:
Now we are ready to do some coding. After implementing our
method, the final
ca_weblite_jniexample_NSSavePanel.m file content
is:
#include "ca_weblite_jniexample_NSSavePanel.h"
#import "JavaNativeFoundation/JavaNativeFoundation.h"
#import "AppKit/AppKit.h"

JNIEXPORT jstring JNICALL Java_ca_weblite_jniexample_NSSavePanel_saveDialog
(JNIEnv * env, jobject jthis, jstring title, jstring extension){

    // Obligatory opening to the JNI method.  Sets up an autorelease pool,
    // and rethrows Objective-C exceptions as Java exceptions.  (Paired
    // with JNF_COCOA_EXT(env) at end of method.
    JNF_COCOA_ENTER(env);

    // A jstring container for the output value
    jstring path = NULL;

    // Placeholder for the NSString path that will be set inside the block
    __block NSString *nsPath = Nil;;

    // Copy the title to an NSString so it an be used safely inside the block
    // even if it is on a different thread
    NSString *nsTitle = JNFJavaToNSString(env, title);

    // Copy the extension into an NSString so it can be used safely inside
    // the block even if it is on a different thread
    NSString *cocoaExtension = JNFJavaToNSString(env, extension);


    // Create a block for the code that will create and interact with
    // the NSSavePanel so that it can be run on a different thread.  All
    // interaction with the NSSavePanel class needs to be on the main application
    // thread, so if this method is accessed on a different thread (e.g.
    // the AWT event thread, we'll need to block and run this code on the
    // main application thread.
    void (^block)(void);
    block = ^(void){
        // This block's code must ONLY ever be run on the main
        // application thread.

        NSSavePanel *panel = [NSSavePanel savePanel];
        NSArray *types = [NSArray arrayWithObjects: cocoaExtension,nil];
        [panel setAllowedFileTypes: types];
        [panel setCanSelectHiddenExtension:TRUE];
        [panel setExtensionHidden:TRUE];
        [panel setTitle: nsTitle];
        if ( [panel runModal] == NSFileHandlingPanelOKButton ){
            // The user clicked OK in the file save dialog, so we
            // now save the user's file path selection in the nsPath.
            NSURL * out = [[panel URL] filePathURL];

            // Set the nsPath so that it can be accessed outside this
            // block after it is run.  We call retain on the string
            // so that it won't be destroyed after the block is
            // finished executing.
            nsPath = [[out path] retain];
        }
    };

    // Check if this is already running on the main thread.
    if ( [NSThread isMainThread]){
        // We are on the main thread, so we can execute the block directly.
        block();
    } else {
        // We are not on the main thread so we need to run the block on the
        // main thread, and wait for it to complete.
        [JNFRunLoop performOnMainThreadWaiting:YES withBlock:block];
    }


    if ( nsPath != nil ){
        // Since nsPath is Not nil, it looks like the user chose a file
        // Copy the NSString path back to the jstring to be returned
        // from the method.
        path = JNFNSToJavaString(env, nsPath);

        // Release the nsPath to prevent memory leak.
        [nsPath release];
    }

    // Return the path.  This may be null
    return path;

    // Matching the opening JNF_COCOA_ENTER(env) at the beginning of the method.
    JNF_COCOA_EXIT(env);

    // It is necessary to return NULL here in case there was some failure or
    // exception that prevented us from reaching the return statements inside
    // the JNF_COCOA_ENTER/EXIT region.
    return NULL;

}
This source code is the result of a few iterations, so it requires some explanation.
The Block. Since we are using a Cocoa component (
NSSavePanel), and it blocks, we need to take some care when it comes to thread management to make sure that the code that interacts with the actual Save panel is running on the main thread. To this end, we wrap most of the code inside a block. Then we use the[+JNFRunLoop performOnMainThreadWaiting:withBlock]method to cause the block to run on the main thread while the current thread waits.JNF_COCOA_ENTER(env) and JNF_COCOA_EXIT(env). These macros are placed at the beginning and end of the method to help with memory management. These will set up an autorelease pool and help clean up memory in case an exception is thrown in the body of the method.
Important
JNF_COCOA_ENTER and JNF_COCOA_EXIT currently cannot be used with Automatic Reference Counting. Make sure you have Automatic Reference Counting (ARC) off in your project, or you will experience crashes at runtime.
Return
NULLafterJNF_COCOA_ENTER. If an exception is thrown inside theJNF_COCOA_ENTER/EXITcalls, then it is possible that none of the return statements will be reached in your method. To handle this case, you should returnNULLafter theJNF_COCOA_EXITcall.The JNI environment should only be accessed from the thread in which the JNI method is called. Notice that we do not use any of the jstring objects or call any JNF functions from inside the block because this block might be running on a different thread than the JNI environment was created on. Accessing one of these variables from a different thread may cause the JVM to crash. We solved this problem by first copying the
jstringvalues that were required by the block intoNSStringobjects which can safely be used between threads.
We're done now. It's time to test it, so we'll build the Xcode
project, copy the libsavepanel.dylib file into the
JNIExample directory (i.e. the Netbeans
project), then try to run the NetBeans test. It should open up a save
dialog as follows:
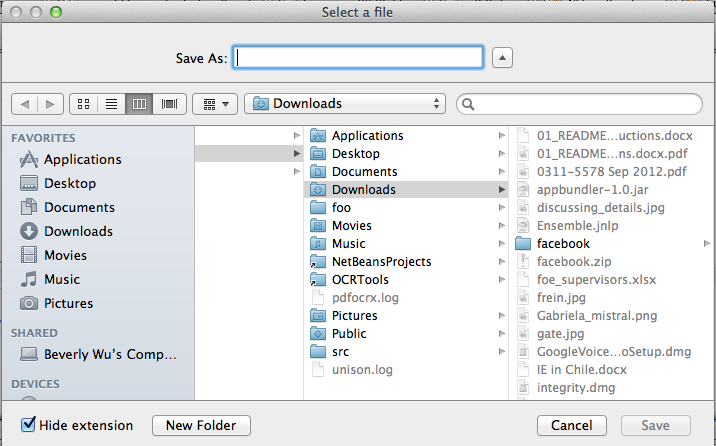
And if you enter a file name, then the dialog will close and you should see the following output in the console:
run:
The result was /Users/shannah/Downloads/testdocument.pdf
BUILD SUCCESSFUL (total time: 1 minute 6 seconds)
By default, Xcode will try to build projects to be deployed on the
latest OS. If you want to deploy it on an older OS (e.g. if you are
building the library on Mountain Lion (OS X 10.8) and you want to make
sure it works on 10.6 or higher), then you will need to set the
OS X Deployment Target setting in the project
properties to the oldest version that you want to target.
If you are planning to include your JNI library as part of a Mac
application bundle, then you should place it inside the
Contents/MacOS directory of the .app bundle. The
JavaApplicationLauncher that is produced by
ApplicationBundler sets this as the default
directory for java.library.path, so your library
should get "found" if it is placed there.
I wrote this tutorial partly because I found that, while there are many resources around the internet on the various aspects of JNI, there weren't any that tied it all together for developing a JNI module for Mac OS X. The following are some useful resources for developing JNI libraries: